Fun With Firearm Lasers: Part 1
Technology provides us with entertainment and innovations that have become, in many ways, necessities. I am old enough to have learned to type on a manual typewriter, physically flinging the carriage back into battery at the end of each line, which was actually kind of fun in a flamboyant motion-and-noise, crusty old-time newspaperman sort of way. In high school, back in the 1400’s, I witnessed and embraced the invention of such wonders as the cassette tape, the touch-tone phone and all-transistor guitar amplifiers. I bought my first home computer, an Apple, in 1986 and have ridden the wave of innovation that flowed from what was then considered the enormous 20 megabyte hard drive of that first machine. So I often take a moment to appreciate the wonder of the technology that drives my iPhone4, which in very real ways puts the world in my pocket.
One innovation that is a boon to shooters, casual and professional, is the laser. Contemporary lasers are small, weigh little, are relatively inexpensive and very effective. One of the best things about lasers is that they actually are a highly effective solution to real world problems rather than the many ingenious solutions to non-existent problems so common in the firearms world.
Note in this first photograph my pre-ban Colt with a few modern enhancements, the most noteworthy of which is the LaserMax Uni-Max Value Pack for Rifles, which retails for $189.00 direct from LaserMax. All of the laser goodies in this post are available direct from the factory. Disclaimer: I am not being paid by LaserMax, nor did they supply this unit to me.
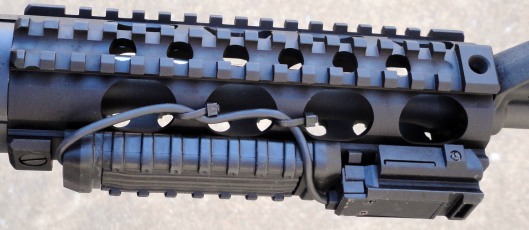
 The package consists of four elements: The Uni-Max ES laser itself, which is essentially an off-the-shelf 5mW unit (the most powerful the law allows) which works equally well with handguns and rifles and comes with a crossbolt-type activation switch which works quite well by itself. It also has a built in rail that allows the mounting of any rail- compatible accessory—such as a flashlight—directly to the solidly built, low-profile laser. The package also comes with a momentary-type activation switch, which neatly replaces the crossbolt switch and has only a 6” straight cord which is far better than the lengthy coiled cords that come with some switches.
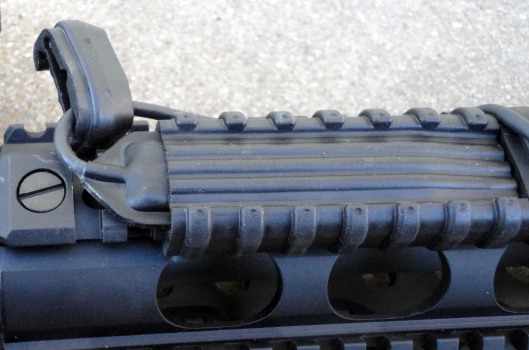
 The really clever and useful part of the package is the MantaRail system which is a neat polymer/silicone sheath for the momentary switch which easily clamps onto a standard rifle rail and is as easily removed. This eliminates adhesives and Velcro, neither of which work well in this application, and it comes with two end caps and three polymer cord routing clamps called, amazingly enough, “MantaClamps.”
 As the photograph indicates, I prefer the simple expedient of two small cable ties that are cheap and easy to remove–via wire cutters–and replace. The MantaClamps are well made, but could easily be dislodged from a rail by aggressive handling. The fore end is by Yankee Hill Machine Company, a firm that makes excellent goodies and does fast, first rate installation work of their products.
The silicone MantaRail sheath also solves another common momentary switch problem: they tend to become quite hot due to electrical resistance if left on more than a few seconds. For military or police operators wearing Nomex gloves, this generally isn’t a significant problem, but for anyone not so protected, it can certainly be annoying. The relatively thick silicon sheath effectively insulates the fingers from any such discomfort. I chose to mount my switch and laser on the right hand side of the hand guard, but they can easily be mounted on adjacent rails.
But wait a minute, aren’t lasers difficult to see at long range and in bright sunlight? Indeed they are, particularly red lasers. Green lasers are generally more visible, but are substantially more expensive ($170.00 more for the same package). So what’s the point? Close Quarters Battle or CQB. For most people, this simply means using a carbine in the home defense role—at short, even handgun, range. If you need to take 100 yard shots indoors, you’re probably Al Gore or John Edwards—you live in a mansion that uses more electricity in a week than most small towns use in a year and that has hallways long enough for track meets and landing light aircraft–and you don’t like guns anyway, at least not when the little people own them.
One of the primary difficulties with any rifle with a high sight line relative to the bore is that at closer ranges, say 25 yards and less, rounds will impact below the point of aim. With the AR-15 family, this means that with iron sights or with an optical red dot sight zeroed for 100 yards, bullets will strike at point of aim at 100 yards. But move to 25 yards or closer and bullets will strike 3” or more below the point of aim.
So what? Just remember that and adjust your aim upward three inches. Unfortunately that’s not a good idea in CQB. Raising the muzzle to compensate obscures the shooter’s view of what they intend to shoot, particularly at the closer ranges encountered in most gunfights. And in the heat of battle, remembering the necessity for Kentucky windage—and making the proper adjustment–is much more easily discussed than accomplished. When it’s necessary to deliver a precise shot at close range, it’s best to know exactly where that shot is going without additional computation and adjustment, and even better, to be able to have the head up and both eyes on the target. That’s where lasers come in.
With an optical sight zeroed for 100 yards and the laser zeroed for 25, it is easy to instantly transition from sight to sight while moving closer to the target. The same mounting and target acquisition motions (presentation) are used for either sight, but with the laser sight at close range, it’s effective to be able to simply look directly at the target rather than through a scope. It does take some practice to condition the brain to see and respond to the laser dot rather than an illuminated reticle, and some practice to work out the slightly different muscle memory required, but it’s not difficult.
Many shooters will tend to first look for the laser dot rather than pointing in at the target. This will tend to cause the shooter to remain in low ready or to otherwise point the muzzle off the intended target. By always concentrating on correct stance and presentation—point the muzzle at the target first–the laser dot will appear in the right area.
By “presentation,” I mean that the shooter should have the carbine/rifle continually mounted on the shoulder in “low ready,” as illustrated by this photograph. This allows a clear view of any potential target. Holding the weapon/sight in front of the face makes it impossible to see anything outside the field of view of the sight, and below it and the weapon.
When it’s necessary to fire, the weapon is merely lifted into shooting position and pointed directly at the target, which should bring any optical—or even iron—sight directly up to the eye. Do not move the eye/head down to the weapon; move the weapon to the sight line.
One should practice this so that when presenting the weapon on any target, the aiming reticle or laser is on target when the weapon is pointed in. This can be done by “addressing” the target—positioning oneself properly in orientation to it left and right—going to low ready, and with the eyes closed and torso relaxed, pointing in. When the weapon is pointed in, open your eyes and using your optical sight or laser, see if you are, in fact, on target. Adjust your foot position and try again as necessary. Once you’ve mastered this bit of muscle memory, target acquisition with any type of sight—particularly at close range—becomes an easy matter. Without this practice, you’ll have a difficult time finding a laser dot because you’re simply not pointing the bore of your weapon at the target.
One of the other advantages of this particular laser is that it can be set for pulse mode, which even with a red laser, produces a much easier to see dot, even in bright sunlight. Indoors, even with bright artificial lighting, the dot is large, brilliant and easy to see. Many manufacturers market green lasers with the claim that they can be seen at 100 yards, which may be true, but not necessarily for everyone. Perhaps young people with fighter pilot-like vision can instantly pick out a laser dot—which will appear to be substantially larger in diameter at 100 yards than 25 yards–on any target at 100 yards, but it’s not always an easy or quick task for me. Add the fact that a tiny misalignment at the muzzle translates to feet rather than inches off target at longer distances, and finding the laser dot becomes even more of a problem.
On the other hand, it’s a piece of cake to immediately present a properly aligned optical sight at that, and greater, ranges, and if you must use the magnification of an optical sight to actually see a laser dot at that range, it’s hard to see the advantage of the laser: you’re already on target with the reticle.
With the laser properly adjusted, bullet impact is right on, and for most people, accuracy, and particularly speed, are enhanced. The eye is naturally drawn to the pulsing dot, which can substantially decrease the time required to place accurate fire on any target. This does not eliminate the need for proper stance, trigger control, grip and presentation, for if one becomes lazy, they’ll lose time looking for a laser dot that is anywhere other than on the target. In other words, you still have to present the weapon as though you were using iron or optical sights, it’s just not necessary to look through them. Leave shooting from the hip to the movies.
Using a rifle in the proper ready position with the laser activated provides several advantages. A bad guy noticing—because you have told him—a pulsing laser dot dancing around just below his belt line might be readily encouraged to cease hostilities. With the dot visible and already aligned with the centerline of the target, it is simplicity itself to point in from ready and fire the instant the dot reaches center mass, all the while keeping your attention and both eyes on what is happening in front of you.
The laser with this package is easily adjusted for windage and elevation with the supplied allen wrench, but know that the wrench is very small and easy to lose as are all allen wrenchs for units this size. Once aligned, the sight tends to stay in alignment. The laser unit weighs very little, is low profile (unlikely to hang up on anything) and quite rugged. Again, it is available individually for $189.00 factory direct. The MantaRail system with the sheath, end caps and three MantaClamps retails for $34.95 and is a great solution for any momentary switch/laser combination from any manufacturer. Once mounted—it’s easy to position and remove—it stays put. However, without the specific ES rifle kit, you’ll have to provide your own momentary switch to slip into the MantaRail sheath, and the long coiled cords common with such accessories more or less lessen the usefulness of the clamps.
There is such a thing as too small, and where laser sights are concerned, tiny, handgun-sized lasers tend to produce smaller diameter, harder to see dots on target. While somewhat larger than some of the more recent laser sights on the market, this particular unit is quite compact for carbine/rifle applications—particularly when compared with military-type units designed for rifles–and probably for larger handguns as well.
I’m pleased with the quality and utility of this LaserMax system and use it on several of my AR systems. I suspect you’ll be equally pleased.


For home defense, as long as I hit within 1 moa (minute of ass) of where I WANT to hit I will call it a good day, so three inches vertical is far below my tolerance level. To me, the real advantage of a laser is the reassurance that I am indeed pointing the muzzle at the target and within 1 moa of where I intend to send the bullet. When I’m sending things around my home at supersonic speed, I want reassurance that I am sending it at the things that are not welcome and NOT sending it at the things that are.
Pingback: A Post-Orlando AR-15 Primer | Stately McDaniel Manor
Pingback: A Basic AR-15 Primer | Stately McDaniel Manor
Pingback: An AR-15 Primer, 2019 | Stately McDaniel Manor
Pingback: An AR-15 Primer, 2020 | Stately McDaniel Manor
Pingback: A Pre-Election AR-15 Primer, 2020 | Stately McDaniel Manor
Pingback: An AR-15 Primer, 2021 | Stately McDaniel Manor